Lifestyle…Family…Design…Travel
Lifestyle…Family…Design…Travel


I FINALLY finished my long awaited back patio project. It took weeks to pull together because life-weather-children-you-name-it but it is DONE.
In a perfect world, I would love to have a very sturdy, built in trellis or pergola…however that is not in the cards for the near future. I wanted to be able to designate an attractive space on our patio that would provide seating, shelter and lighting and not be mired in kid central with backyard toys and such. We have a great size backyard but our patio isn’t huge and has a free form curved design to it. This again made it a little tricky to plan.
I settled on something that feels permanent but is ultimately moveable, ie: no need to drill and set pillars into the concrete. My solution for carving out this space was to set four poles in quick set concrete using Home Depot buckets, then sink those buckets into concrete planters, plant flowers in said planters, string lights and eventually (when it is warmer) hang a sail over the tops of the poles for shade. I spent a fair amount of time on Pinterest (here is my Pinterest board on outdoor spaces where I saved some of my favorite ideas) and Google figuring out how I wanted to accomplish this. I found this tutorial and this tutorial both very helpful for how to assemble all of my supplies; I changed up a few things to my taste but the tutorials are still really good. Finally, I visited Lowes, Home Depot and Ikea for necessary supplies. Shall we get into it? OK, let’s go!
Supplies Needed (see links below for exactly what I got):
– (4) heavy duty chrome closet poles measuring 96″/8 feet tall. You do not want adjustable poles. I would steer away from wooden poles because over time they will rot and then all of your hard work to set them in concrete will be for naught.
– (4) closet pole end caps (put these on top of your poles so that rainwater doesn’t pool down inside of them.
– (4) 5 gallon Home Depot (or bucket of similar size).
– (4) 50 pound bags of Quikrete fast set concrete mix (I wanted roughly one bag per bucket).
– (1) roll of Gorilla Black and Wide Duct tape (you will need this to hold your poles in place within the buckets while your fast set concrete is setting. This is the best brand of tape for this project!
– Pitcher for water and a mixing stick (paint sticks from Home Depot or Lowes work great) – these will be for prepping and spreading your fast set concrete in the buckets.
– (4) large concrete planters. I bought mine from s Target garden center about ten years ago and sadly they no longer carry them but these look a lot like what I bought. It is important that your planter is NOT fluted down towards the bottom. You want a flat bottom that is roughly the same width as the top otherwise your poles in their containers run the risk of blowing over in higher winds. Trust me. I know this. I made a mistake with the size of one of my planters and it was a giant mess of broken light bulbs and dirt and plants to clean up. Learn from me and get the right size of planter at the beginning of your project. Rant over.
– Several cans of Rust-Oleum Universal Flat Soft Iron spray paint. You can choose any color you would like, this is just what I chose to spray paint my existing concrete planters. I wanted a uniform look with the planters that blended well with my iron patio table and chairs. The Flat Soft Iron was an exact match.
– Bag of pea gravel or lava rocks like this. This will be filler on top of your set concrete in the bucket and around the bucket set into the concrete planter. I will explain in more detail further below.
– 2-3 small/medium plants for your planters. I prefer a mix of colorful flowering plants and trailing plants in my patio planters.
– Small hand shovel for potting plants.
– As many bags of potting soil as you think you will need to pot your plants into your concrete planters around the cemented poles.
– Heavy Duty Outdoor Extension Cord. Mine is 75 feet which is a little overkill but it does give me some flexibility should I ever decide to move things around. Make sure the cord is outdoor.
Zip ties. I chose medium size to attach the cord to the cemented pole and the lights to the poles and each other. Trim the excess.
– 3-4 packs of outdoor hanging lights. I chose these from Hampton Bay and have been extremely happy with their quality. You can also find string lights on my Amazon page right here. We get some crazy wind in these parts and the rain/hail has been pretty epic of late. I haven’t lost any bulbs due to weather so these are a win in my book.
-Sailcloth for shade. I purchased mine at Costco a few months ago and now I do not see it on their website. Here is one that is similar to what I purchased.
And of course, the last thing you will need is the element of time. This is a project that takes a little bit of time mainly owing to the need for the concrete to set the poles properly. If you purchase the quick set concrete that I linked to above, you will be in good shape.
Here is how the space looked before I did my patio planter remodel:

I had existing concrete planters, as I said, but they were not all the same color. I wanted the planters and poles to have a very uniform, dark neutral look so that the flowers and string lights would be the focal point. I cleaned out my planters (and was able to repurpose most of the geraniums that had been planted in there) and then spray painted them generously with the Flat Iron Rustoleum spray paint.


Next I set my closet poles into the Home Depot buckets the way I wanted them and secured with the gorilla tape. I taped all poles into their buckets at once and then moved down the line with my concrete mixing. If you have a buddy to help you with this part of the project GO GRAB THEM! The tape is awesome but having someone actually hold the poles in place is even better. That wasn’t an option for me so the tape had to do.

While the quick set concrete was doing its work I took time to further spray paint my planters with a few extra coats of paint. I also measured exactly where I wanted all of my planters to sit on the patio; once those heavy planters WITH the concrete pole buckets are set they are very hard to move. Do yourself a favor and get planters moved into place the first time so that you do not need to move them.

Once all of the buckets were completely set with the poles in concrete (by the way, I waited 24 hours for this piece of the project), I hefted each bucket into the now dry planters at the four corners of my patio. I’m fairly strong but this part was HARD. Also, the bottoms of the planters aren’t perfectly flat so I needed to make some adjustments with sprinkling in small black lava rock until the concrete bucket was sitting exactly the way I wanted it in the planters. Once I had everything level in each planter, I filled the remaining space and crevices with more lava rocks and dirt. I left room in the top 1/3 of the bucket for good quality potting soil to set my plants in.


At this point I took a break from the concrete and soil and focused on getting my extension cord and lights figured out for the space.


Be careful when you are unpacking multiple boxes of string lights. I unpacked mine over the grass which probably saved a bulb or two; they can break really easily. Lay out all of your strands and figure out in advance how you are going to connect them to a power source, to each other and to the poles. Zip ties are your friends!


Once I had all of my lights set, I returned to planting my actual plants. I waited to do this until my poles and electrical were done in case I had to move things around. I didn’t want to disrupt freshly potted plants if I didn’t have to.


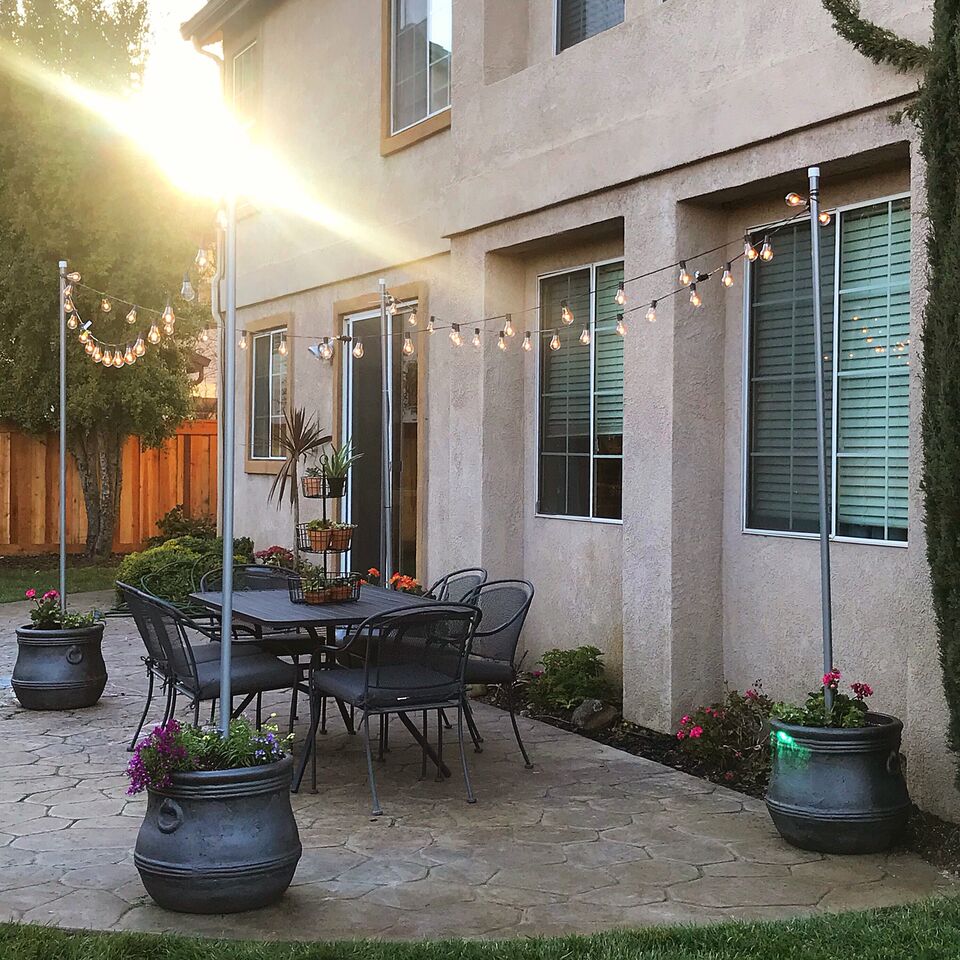
Finally, after some cleaning up, sweeping and a few additional decorative touches (like the three-tiered plant stand on the table from Ikea) it was DONE.


And there you have it! See, it really isn’t that hard or expensive. It take a little time but I think the entire space looks classy and can lend itself to any kind of look or celebration going forward. The sailcloth will be added in the warmer months for shade so I will post an update with that once we have it installed. I love this new space! We turn on the lights most evenings so that we can see them through our windows if we are indoors. Once it really warms up I can tell this will be a constantly used space. I am also hoping to add a firepit and an outdoor couch to this area eventually; stay tuned for more updates as I make them!


Talk to me!