Lifestyle…Family…Design…Travel
Lifestyle…Family…Design…Travel


Do you have those horrible white 6 inch tiles on your kitchen or bathroom counters? You know the ones I am talking about right? Well, I have been looking for a way to divorce myself from the white tiles on my laundry room counter for a long time and folks, I have an amazing workaround to your tile issues! Even if you like your plain white tiles, you can make the change that I did and have an entirely new look for your space!
On our trip to Morocco three years ago, I fell hard for the intricate tile work found all over the country. I found MANY tiles I wanted to buy and bring back but without having dimensions or an actual project in mind, I passed and did not buy any. Yes, I kick myself about once a month for making that choice but what can you do, right? The next time I am in Morocco I commit to buying many, many tiles but in the meantime, I learned how to create my own Moroccan inspired painted tiles. Thanks to a great stencil and the magic of Annie Sloan Chalk Paint I have a completely revamped laundry room counter. Today I am going to give you a step-by-step tutorial on how to do this yourself and what supplies you will need.

First off, supplies. To carry out this project you will need:
-Awful/outdated/unwanted tile counters or backsplash. See, those are going to come in handy! Measure your tiles; most found on counters are the standard 6″ but there are a bunch of 9″ ones out there too.
-Moroccan stencil. I ordered mine from a company called Cutting Edge because a friend of mine carried out a similar project and ordered her stencils from the same company. I was really happy with the quality and overall ordering process. You will want to order multiple stencils because you will need to cut different sizes to accommodate the various tile sizes found on your counter or backsplash. For this project, I ordered three. Here is the stencil I ordered. I specifically looked in the “Tile Stencil Designs” tab on the website.
–Blue painters tape. You’ll use this to tape down your stencil and tape off your walls around the tile.
–Kilz Latex Primer – you will use this as your base coat all over the tiles you are planning to divorce/stencil.
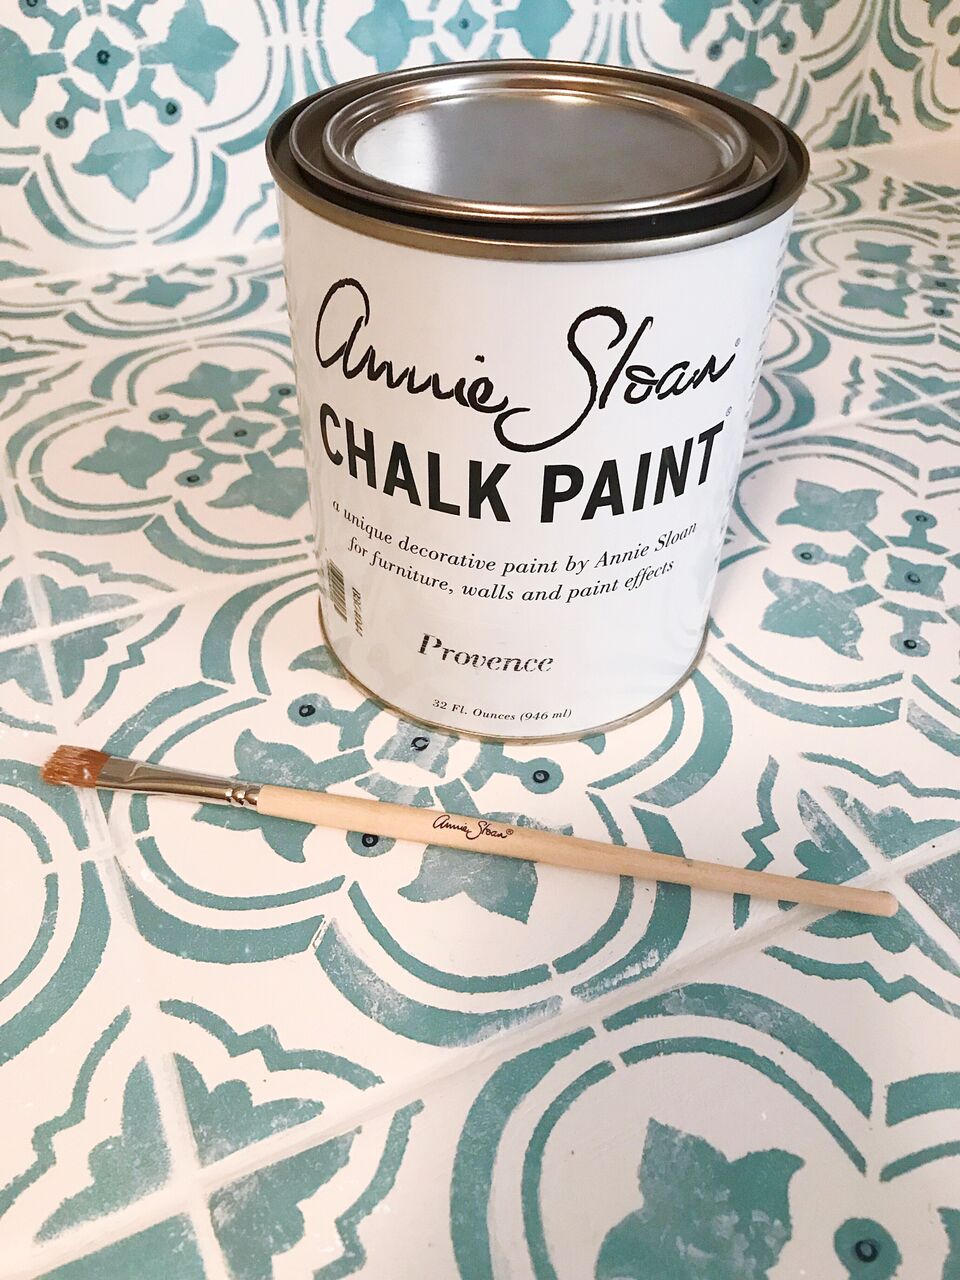
–Annie Sloan Chalkpaint. There is a huge color wheel of options available to you in the Annie Sloan arsonal. I chose Provence because it is both my favorite color AND I have used it in multiple projects throughout my house.
–Annie Sloan wax. This is what I used to seal and finish my stenciled tiles.
–Annie Sloan detail brushes and wax brush.
-Mini paint roller. You will use this to apply the Kilz.
-Scissors to cut stencils as needed.
-Straight edge ruler and pen to mark. You will use these when it comes time to cut your stencils down to smaller sizes to accommodate smaller/unusually shaped tiles.
-Paper towels or rag to clean up paint
-Clean cloth or rag. This will be used to wipe up the excess wax when you are done applying.
-Q-tips. I used these to clean up small mistakes while the paint on my stenciled tile was still wet.
-Patience. Time. The ability to not freak out when things are not going as planned! I can’t emphasize this enough: you have got to work patiently and carefully or you are going to make yourself crazy. Leave yourself enough time so that this process is not rushed. I completed this entire project over the course of two days and on the first day, I probably put in eight solid hours of work. I was seeing the tile design when I closed my eyes. It was in my dreams that night! Be patient and do not rush!
Here are a few BEFORE photos of the counters and the space prior to becoming Moroccan-ized (I just made that word up):

We have one built in cabinet with white tile counter and backsplash. We also added a drawer unit that I thrifted awhile ago along with a marble slab as the counter. My goal was to make both of these surfaces cohesive with the Moroccan stencils.

OK, so now onto our brief tutorial.
You will want to rough up your tiles a little before applying Kilz. I got some rough sandpaper we had lying around in our garage and just scratched it over the tiles for a few minutes, then wiped everything down with a clean cloth.

Next you will want to tape off the edges of anything you will be painting to protect your walls/backsplash/anything you don’t want a roller or paintbrush running up against.

After taping is completed, you will apply Kilz. This part is pretty fun and easy because you just paint the whole surface, grout and all. I did two coats on mine with a roller and a brush for the detail and grout crevices and recommend that same number of coats.


The marble slab got three coats of Kilz because it was a darker shade to start off and the tile was already white. It took a little while for everything to dry so while I waited I assembled my tile stencils and laid out all of my tools. I’ll admit, I was a little nervous about how this was going to go: I had never stenciled anything before this project!

I started with the full 6″ tiles on my counter since those were easiest to work with. I taped down the edges and used my Annie Sloan stencil brush. The stencil brush is HUGELY important and works more precisely than a roller (trust me on this; I tried both). If you have a tile counter or backsplash, there will be some odd shaped tiles especially on the borders. Use your full size stencil on all of the full size tiles FIRST. Worry about the smaller, odd shaped ones later. That is why you need to buy more than one stencil because you will have to cut them down to the size for the smaller tiles.

Look at that progress!

Every few tiles I would come through with my Annie Sloan detail brushes and clean up edges that paint had bled through on the stencil (so frustrating but it’s going to happen) or to define edges a bit better. I used my smallest detail brush with white paint to clean things up. The Chalkpaint dries quickly so I was able to work with it about five minutes after stenciling a tile.


 I can’t say enough good things about the high quality of these detail brushes. They are FANTASTIC, hold and move paint beautifully and I highly recommend them.
Once all of the big tiles were taken care of it was time to move onto the smaller, odd shaped tiles. I ended up creating three more stencils to fit the tiles that I had. I decided that I wanted the tiles to look old and distressed, so I used a dry brush with some white paint and made the tiles look roughed up. If you want a distressed look this is an easy way to accomplish it. Plus, the distressing hides a lot of mistakes and flaws in your stenciling work; this was important to me!

Once all of my distressing was complete it was time to clean up my work area and prepare for the final sealing with Annie Sloan Wax. This is the last step! The waxing was my favorite part.


You don’t need a ton of wax on your brush; just follow the instructions on the can of Annie Sloan wax and you will be in good shape. I got wax on my brush and then worked it INTO the tiles, being careful to cover all of the surfaces as well as the grout.


It took about ten minutes to cover both the tile counter and the marble counter with wax. Super quick. Once I was finished applying I went back over everything with a clean cloth to remove excess wax. And then it was DONE.


I gave everything 24 hours to fully cure but the wax was dry to the touch within an hour of finishing. I actually prefer the finish of the wax for this project because it adds to the overall feel of my tile. It makes it feel more substantial. I’ve already cleaned off the counter with water and disinfectant wipes multiple times (this is a laundry room, after all) and the finish remains beautiful. Waxing is great for the laundry room!
Once I had cleaned up my paint/stencil mess and the counter was truly complete it was time to accessorize the space. I bought some new Moroccan-inspired knobs from Cost Plus World Market for my cabinet doors and drawers and it helped to tie everything together.


Then it was time to put things back into place on the counter. We have these wooden bins that stack on the counter; they house supplies for our dog, school lunch items and other odds and ends that need a home in the laundry room. I try to balance all of that out with some succulents (I found these at Michaels about a year ago).


This project turned my ugly tiles into something beautiful that I love to both look at and touch. Annie Sloan Chalkpaint is a miracle worker and I am so thankful to have this counter looking like a showpiece instead of something I try to hide. Do you have a nasty counter in need of some refreshing? Do you love the look of Moroccan tiles? You can DO THIS!!!! Comment with any questions or suggestions below!
*Thank you to Annie Sloan for sponsoring this post. I have used Annie Sloan Chalkpaint for many years and have been happy with every project I have completed using their products. There are many wannabe chalkpaints on the market. Don’t mess with those, use the original and the best! Thank you Annie Sloan – I am thrilled with these results!


Talk to me!