Lifestyle…Family…Design…Travel
Lifestyle…Family…Design…Travel


I’ve got a bit of a Tour Tuesday on here today; this time it is our entry way foyer! To be honest, we don’t have a proper foyer. The space is more like a long opening into two living rooms and a small bedroom off to the side. From the front door you can see two large rooms and our staircase but nothing about it says “Foyer”! When we moved into our home nearly 11 years ago, I hung a gallery wall in this area and basically called it good. Because we don’t come in and out of our front door (we use the garage for that) I have found that days will go by where I don’t even notice our pretend foyer. We do, however, have a daily flow of other people coming through our front door and so I decided it may be time to freshen up this space.
First, I removed ALLLLLLL of the photos/frames/stuff on the walls. It felt like it was taking forever but mainly because 1) it wasn’t fun and 2) I had to spackle A LOT of holes in the wall. Ugh. Anyway, once the wall was appropriately prepped it was time to purchase and hang the wall paper.
I found this wall paper at Target. Did you know that Target has the most amazing lines of wall paper? For this project I chose one called Devine in the color ‘Celestial’. As soon as I saw it I knew I wanted my whole foyer wall to be covered in. It is dark and bold and really packs a punch and I was nervous to throw it up on the wall! Everyone in our house was dubious about my choice but I knew in the end it would look amazing. It was just going to take time.


Hanging the wall paper was very time consuming. I mean, it always is and I ALWAYS forget. It’s like pregnancy and childbirth; you just remember the end result being so fantastic and not all of the pain it took to get there. I have hung wall paper all over my house and I swear I never remember how awful it is to hang. The Target wall papers are actually really easy to use; it is just the prep and cutting and making sure everything is perfectly lined up and even. With this particular pattern I was free from a lot of the constraints you sometimes have with the stress of hanging wall paper. This was a random pattern and so if things weren’t lined up perfectly it was OK.
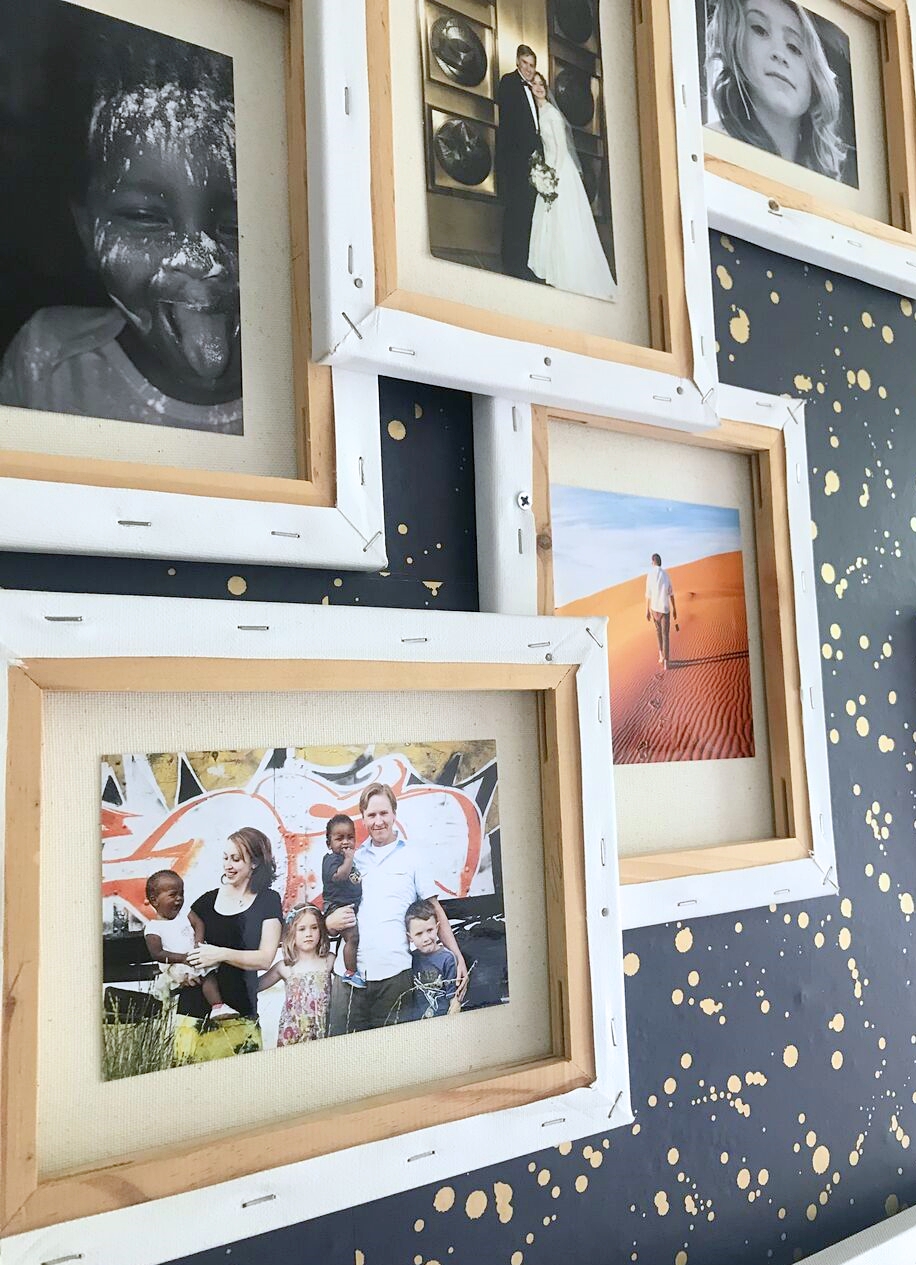
Once the wall paper was all hung (I accomplished this over two nights after kids were in bed) I turned my attention to my frames. Years ago I saw an amazing photo display at Anthropologie and ever since it has become my go-to for how to showcase photos. The exhibit took plain canvases and turned them around with back frame side facing out, attached a photo in the middle of the turned around canvas and then hung it up. I get compliments on this arrangement by everyone who comes through our front door. I always give the Berkeley Anthropologie store on 4th Street credit :). Because we have a ton of new photos I needed to assemble some new frames! You just position the frames in the shape you want and nail in a few finishing nails to hold into place. Hot glue your photos onto the canvas once your frames are all in place. When it comes time to hang, I use a few screws to attach them to the wall.


Once the frames and mirrors were up I was really starting to get excited! It looked even better than I had hoped! The palm tree is also a Target find and softens the corner in the entryway.


I have found myself standing in front of this wall many times since finishing it. Wow there are a lot of memories on this wall! I also really like that there is still plenty of room to add more of my backwards canvases filled with new photos. I would say this project was a little labor of love and completely worth the time spent with my exacto knife.


Do you like the backwards frame idea? You should try it for your own space! I guarantee it will always get some comments. What have you done to make your foyer really pop? Do you have a dedicated foyer space in your home? If so I am slightly jealous!


Talk to me!